Three pairs in Azita’s class begin their final apps

Azita, at Andrews Middle School in Medford, is nearing the end of her Middle School Pathways curriculum. Students yesterday did their usual free-typing exercise for the first five minutes of class, then they either continued with a tutorial of their choice (one with a similar functionality to their own intended app) or, just jumped into programming their app itself. Azita typically projects the day’s agenda onto the whiteboard:

azita-agenda

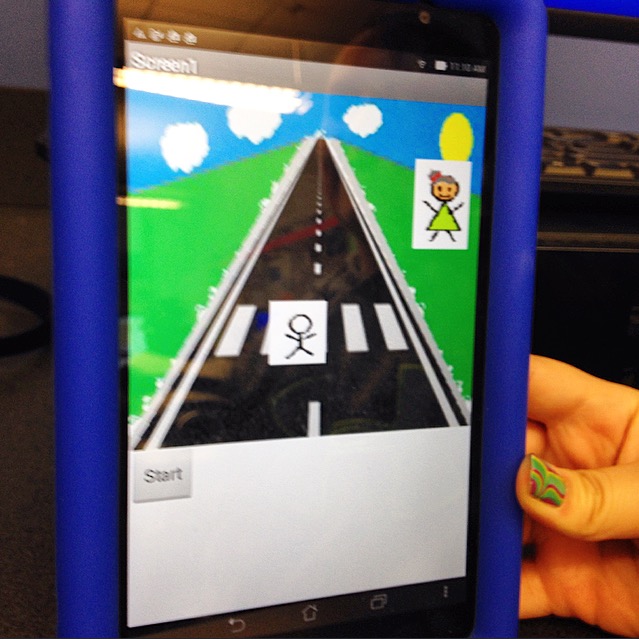
Her students – using the pair programming approach – are at varying stages of producing their final apps. One team is working on a game where the user can help elderly people cross the street. Here is their app layout so far:

crossing-street-design

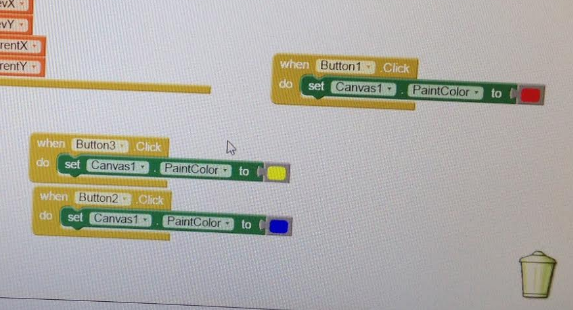
And here is the beginning of their code:

crossing-street-code

Another is working on an extension of the Digital Doodle app, where you can import a picture of your friend’s face, trace over it, and then remove the picture to reveal a Picasso-esque drawing. It’s like a drawing-helper app. Maybe we will see some similar things come out of Debbie’s art/technology classes over at McGlynn Middle School.

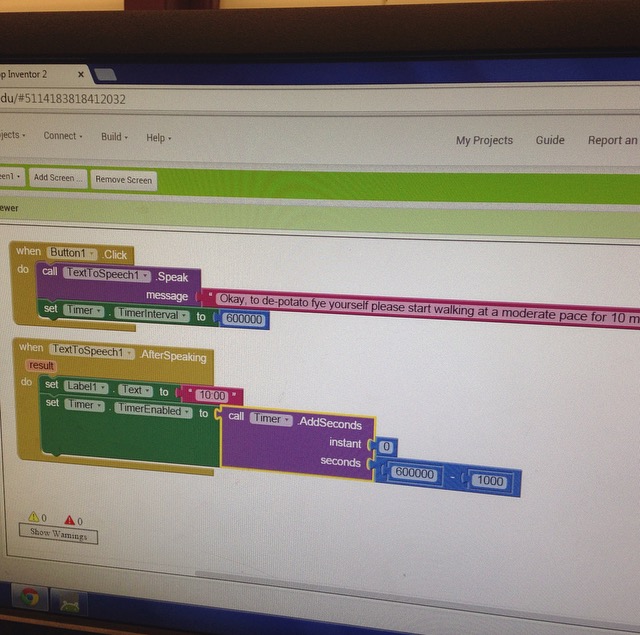
Another team found an image from an amusing potato meme online, and used it to test out loading pictures into components. This evolved into an idea for a fitness app, where the user’s avatar begins as a “couch potato” and turns into a stalk of asparagus once they finish their workout.

potato-design

The user will click a button, which triggers a text-to-speech function that gives an instruction to start walking. Then it sets a timer to count down the seconds, and ultimately change the potato image into an asparagus image.

“Okay, to de-potato-fye yourself please start walking at a moderate pace for 10 minutes.”

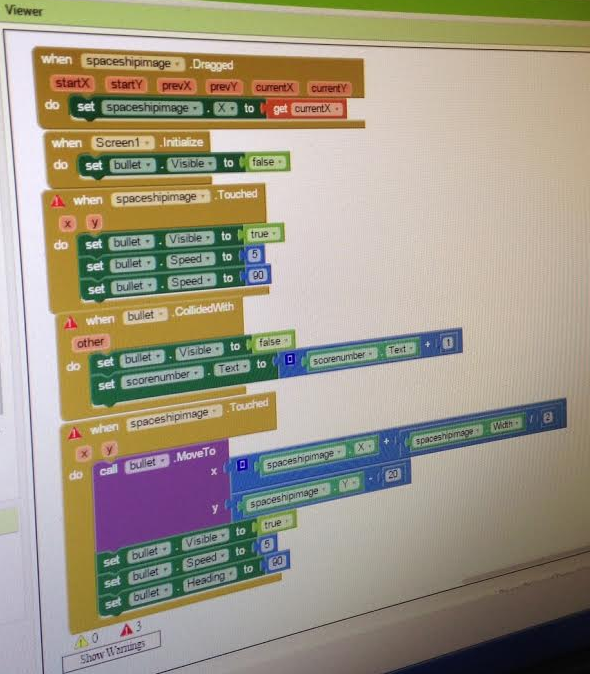
The pair can’t stop giggling! While they are having fun with the sometimes unexpected path of their creative process, their main focus is getting the timer function to work. Here is their code so far:

potato-code

The MSP curriculum with Azita’s class has certainly flown by! Other students are excited to incorporate the tablets’ GPS functionality into their apps. Stay tuned – more to come.

Transitioning from tutorials to building unique apps

Mike is about two-thirds finished with the curriculum for his two eighth grade classes at McGlynn Middle School in Medford.

On today’s agenda, the students continued to develop their programming skills with tutorial apps, and also brainstormed ideas for developing their own, unique ones.

I. Finishing up the tutorial apps

The students have been working on different tutorial apps at different paces.

One pair worked on extending “Two Things,” an app that features a picture of an elephant and a picture of a monkey, plus buttons to play their corresponding animal noises. This app requires one sound to pause when another one starts playing – a slightly more complex feature than introductory text-to-speech apps, which play sounds all the way through.

At first, the students struggled with the idea of nesting one logic statement within another in order to detect state – and how, exactly, these statements get ordered. We decided that sometimes, it helps to say the logic out loud in English before trying to fit the blocks together on the fly. The students nearly had this code block working (changing the if-statement to an if-else statement)… when the bell rang!

if-else-almost-finished

Another pair had extended their Digital Doodle app to include more colors:

doodle-more-colors

Excited to get things bouncing around the screen, they moved on to the Mini Golf tutorial. Another pair had similar excitement with the Space Invaders tutorial – but kept getting frustrated by red triangles, which indicate errors in the code. We talked about the importance of resolving bugs as you go, instead of letting them accumulate.

warning-messages-spaceship

II. Developing unique apps

The other part of Mike’s lesson was to get the students thinking about the meaning behind their Martin Luther King app tutorial. What sorts of apps could they create that would be meaningful and helpful to their own communities? Students wrote their ideas on the board over the course of the classes.

8A-themes    8B-themes

Most of these ideas related to their own interests and hobbies:

  • a tutorial app that would help someone maintain/fix a motocross vehicle
  • a tuning fork app that can help musicians tune their violins and cellos
  • a drawing app that will help basketball coaches explain plays to the team
  • a fill-in-the-blank grammar game that will help children learn the parts of speech

Next class, the students will vote on which ideas they like best, and will begin developing their own unique apps.

A simplified MoleMash

The MIT MoleMash tutorial for App Inventor introduces several best practices.

But sometimes “best practices” distract novices from what they really need to understand.

MoleMash means to introduce these particular big ideas:

  • sprites—which can move around and react to being “touched”
  • the random function, and using it to move a sprite by setting its X and Y coordinates
  • keeping a score variable, and incrementing it.

But the tutorial obscures these ideas by forcing you to learn other stuff:

Subprocedures. The code to move the mole around is put into a subprocedure.

  • But it’s only two lines long. We don’t need a subprocedure for this.

Positioning the mole by querying the canvas for its dimensions, constructing them as a ratio, and scaling it to the full canvas size by multiplying by the “random fraction” primitive. Seriously? I can barely understand this.

  • Let’s just hard-code some X and Y limits. It’s easier to explain to kids this way.

Concatenating label text with a numerical value. The approach for keeping score uses both a label to hold the word “Score” and a global for keeping track of the score number. Then, to update the score, the label “Score” plus the number value are concatenated.

  • Let’s just put a number only in the text label. Then we don’t need a separate global, and we can increment the label’s text directly.
  • Also there’s no need for an UpdateScore procedure.

With this simplified MoleMash, the entire code is this:

Code for simplified MoleMash.

This is far, far simpler than the MIT code.

Notice that the bounds of the random X and Y coordinates are 1 to 100. These are the default parameters of the “random integer” block when you pull it out of the palette.

This means that the mole will only jump about in the upper left corner of the canvas. That’s fine! Kids can figure out on their own how to expand the range.

For beginners, it’s better to use concrete values than abstract functions.

Time to MoleMash!

Azita is a technology teacher at the Andrews Middle School in Medford. This is her computer classroom:

Azita's classroom.
Azita’s classroom.

Kim, Akira and I visited with her today as she was introducing the MIT MoleMash tutorial to her students. They had previously worked on the MIT Paintpot tutorial.

Most of her students already had PaintPot working. Azita encouraged them to move on to MoleMash—if they needed to go back to PaintPot later, they could do that.

As with all of the other project classrooms, students were working in pairs.

The students had already been introduced to the Canvas in PaintPot. MoleMash introduced several new concepts—a sprite component inside the canvas, a clock component (which triggers the mole’s movements), and random numbers.

All four of us went around and worked with the students in small groups. Most of them were able to construct the interface elements for MoleMash. When I had the opportunity, I described the clock and random movement code to students directly, rather than having them copy it out of the tutorial.

I worked with two students in particular, Jamal and Raul, who were delighted when they got the mole jumping around! Then I encouraged them to explain their code to other students.

Extending the text-to-speech app

Mike is an engineering teacher, so his kids work in a spacious lab with lots of work areas, not just computers:

Mike's engineering classroom at Andrews Middle School
Mike’s engineering classroom at McGlynn Middle School

This was Mike’s 7th day into the Pathways in CS curriculum. Some of his students continued work on their versions of the MIT TalkToMe demonstration text-to-speech app, while others began the MIT Digital Doodle app. Like the other project classrooms, students were working in pairs, and midway through the class period, Mike asked them to “switch drivers” so that all students had mouse/keyboard time.

Some of his students were taking TalkToMe in fun directions. One pair of girls was working on “virtual boyfriend” app. When you pressed the button on the screen, the app would tell you a story in a deep British accent.

Another group was working on a Fortune Teller. Using App Inventor’s random number generator, the app would answer “Yes” or “No” to the question you typed in. Their code looked like this:

Fortune teller code—depending on the length of your question, you're more or less likely to get a “Yes” as the answer.
Fortune teller code—depending on the length of your question, you’re more or less likely to get a “Yes” as the answer.

The kid named Simon had keyed in the question—“Simon is awesome.” At first, their number range was from 1 to 50, so the app was mostly saying “No.” I encouraged them to think about how likely it was to say yes or no. At first they thought it was just random—or equally likely—but then the realized they were getting lots more No’s then Yes’s, and changed the range from 1 to 25. (The threshold between No and Yes is the length of the question-string. I had previously helped them with the length block.)

After class, Mike showed me his 15-session lesson plan for the project. He is taking notes after each session as to what’s actually been accomplished each day. Here’s the plan:

Mike class Mar 17_2

In the next class, he’ll be helping student learn about audio files, and getting them thinking about their final apps.

Doing the Digital Doodle

Debbie’s class has the computers arranged in rows, like this:

Debbie is using this computer room in the Andrews Middle School.
Debbie is using this computer room in the McGlynn Middle School.

All of the students were working in pairs.

In her class today, the students had built the MIT “Digital Doodle” tutorial, which lets you draw on the tablet using a Canvas component (see http://explore.appinventor.mit.edu/sites/all/files/hourofcode/DigitalDoodle_2perpage.pdf). The key bit of code looks like this (from Page 7 of the tutorial):

Code from MIT Digital Doodle tutorial PDF.

They all had it working. So then I asked them, can you get it to draw a different color?

A few of the students figured it out. Here’s the code from one of the groups:

Adding color to the Digital Doodle app with the Set Canvas PaintColor method.

The new part is the “Set Canvas PaintColor” command, plus the use of a color block.

I asked the students who figured it out to share the solution with each other.

Creative Commons images and teamwork

In Dawn’s classroom today, students were working on pairs on Macs. Here’s a photo of her lab (the kids had already left when I took the photo):

Dawn's classroom

She was leading a lesson that was projected at the front of the room, so all of the kids could see what she was doing. (She was standing off to the right side of the room, working on her own Mac.)

Dawn had the kids learn how to do safe searches by including the phrase “Creative Commons” in your search. She told them this will provide images that they’re allowed to use in their apps—even if they want to sell them in the Google Play store! She gave them an example of “creative commons pizza,” which produces results like this:

Creative Commons pizza search

Yum—when is lunch time!

Then she showed them how to right-click on an image and save it to the students’ project folders. This was trickier than it sounds, because most of the computers had that Apple mouse with the scrolly-wheel and no obvious right button! So students had to Control-click to get the pop-up menu with the “Save Image As…” dialog!

Dawn made a worksheet for kids to follow. It looked like this:

Dawn's worksheet for kids to search and save images.
Dawn’s worksheet for kids to search and save images.

Previously, Dawn had done a session with students where they brainstormed about what makes a good partner. Here’s what the class produced:

Dawn's class brainstorms about good partnerships!
Dawn’s class brainstorms about good partnerships!

Overall, today’s lesson was skill-building for when kids move on to making their own apps.

Rugged tablet cases and tablet cart

I visited the schools for the first time since the project has been running!

Which reminds me of one other part of the tablet story—rugged cases and the cart.

You definitely need drop-proof cases for the hardware—or at least, highly drop-resistant ones. We got these from Bobj:

Bobj rugged tablet case

Here’s a link to them on Amazon. They cost about $22 ea. Definitely worth the money to protect a $150 tablet.

The other part of the story is the tablet cart. It organizes all 20 of the classroom tablets. We numbered each tablet and each slot, so kids know where to put their tablets back. When Debbie’s class was over, she called them up by groups—1 through 5, 6 through 10, etc. so kids wouldn’t get too much in each others’ way putting the tablets back.

The cart cost about $1000. It has all the chargers installed with individual USB cables tied in place for each slot. It’s on wheels, it’s solid, and it locks. Totally necessary.

tablet cart

ASUS MeMO Pad 7s!

We decided to standardize on the ASUS MeMO Pad 7 for the first year of our project. This tablet has a good combination of a decent screen, solid build, and reasonable price.

One key feature of these tablets is that they have regular micro-USB ports for charging, and they will charge when plugged into a computer. Kids can use them all day plugged in and they’ll stay charged. Samsung tablets will only charge from their special adapters, and the 7″ Google Nexus tablet (otherwise our first choice) is no longer being manufactured.

We bought the MeMO Pads from a tech integrator, together with charging carts for each classroom.

The exact model is the ASUS MeMO Pad 7 ME176CX.

ASUS MeMO Pad 7 in a rainbow of colors (I think we just got the black ones.)