A simplified MoleMash

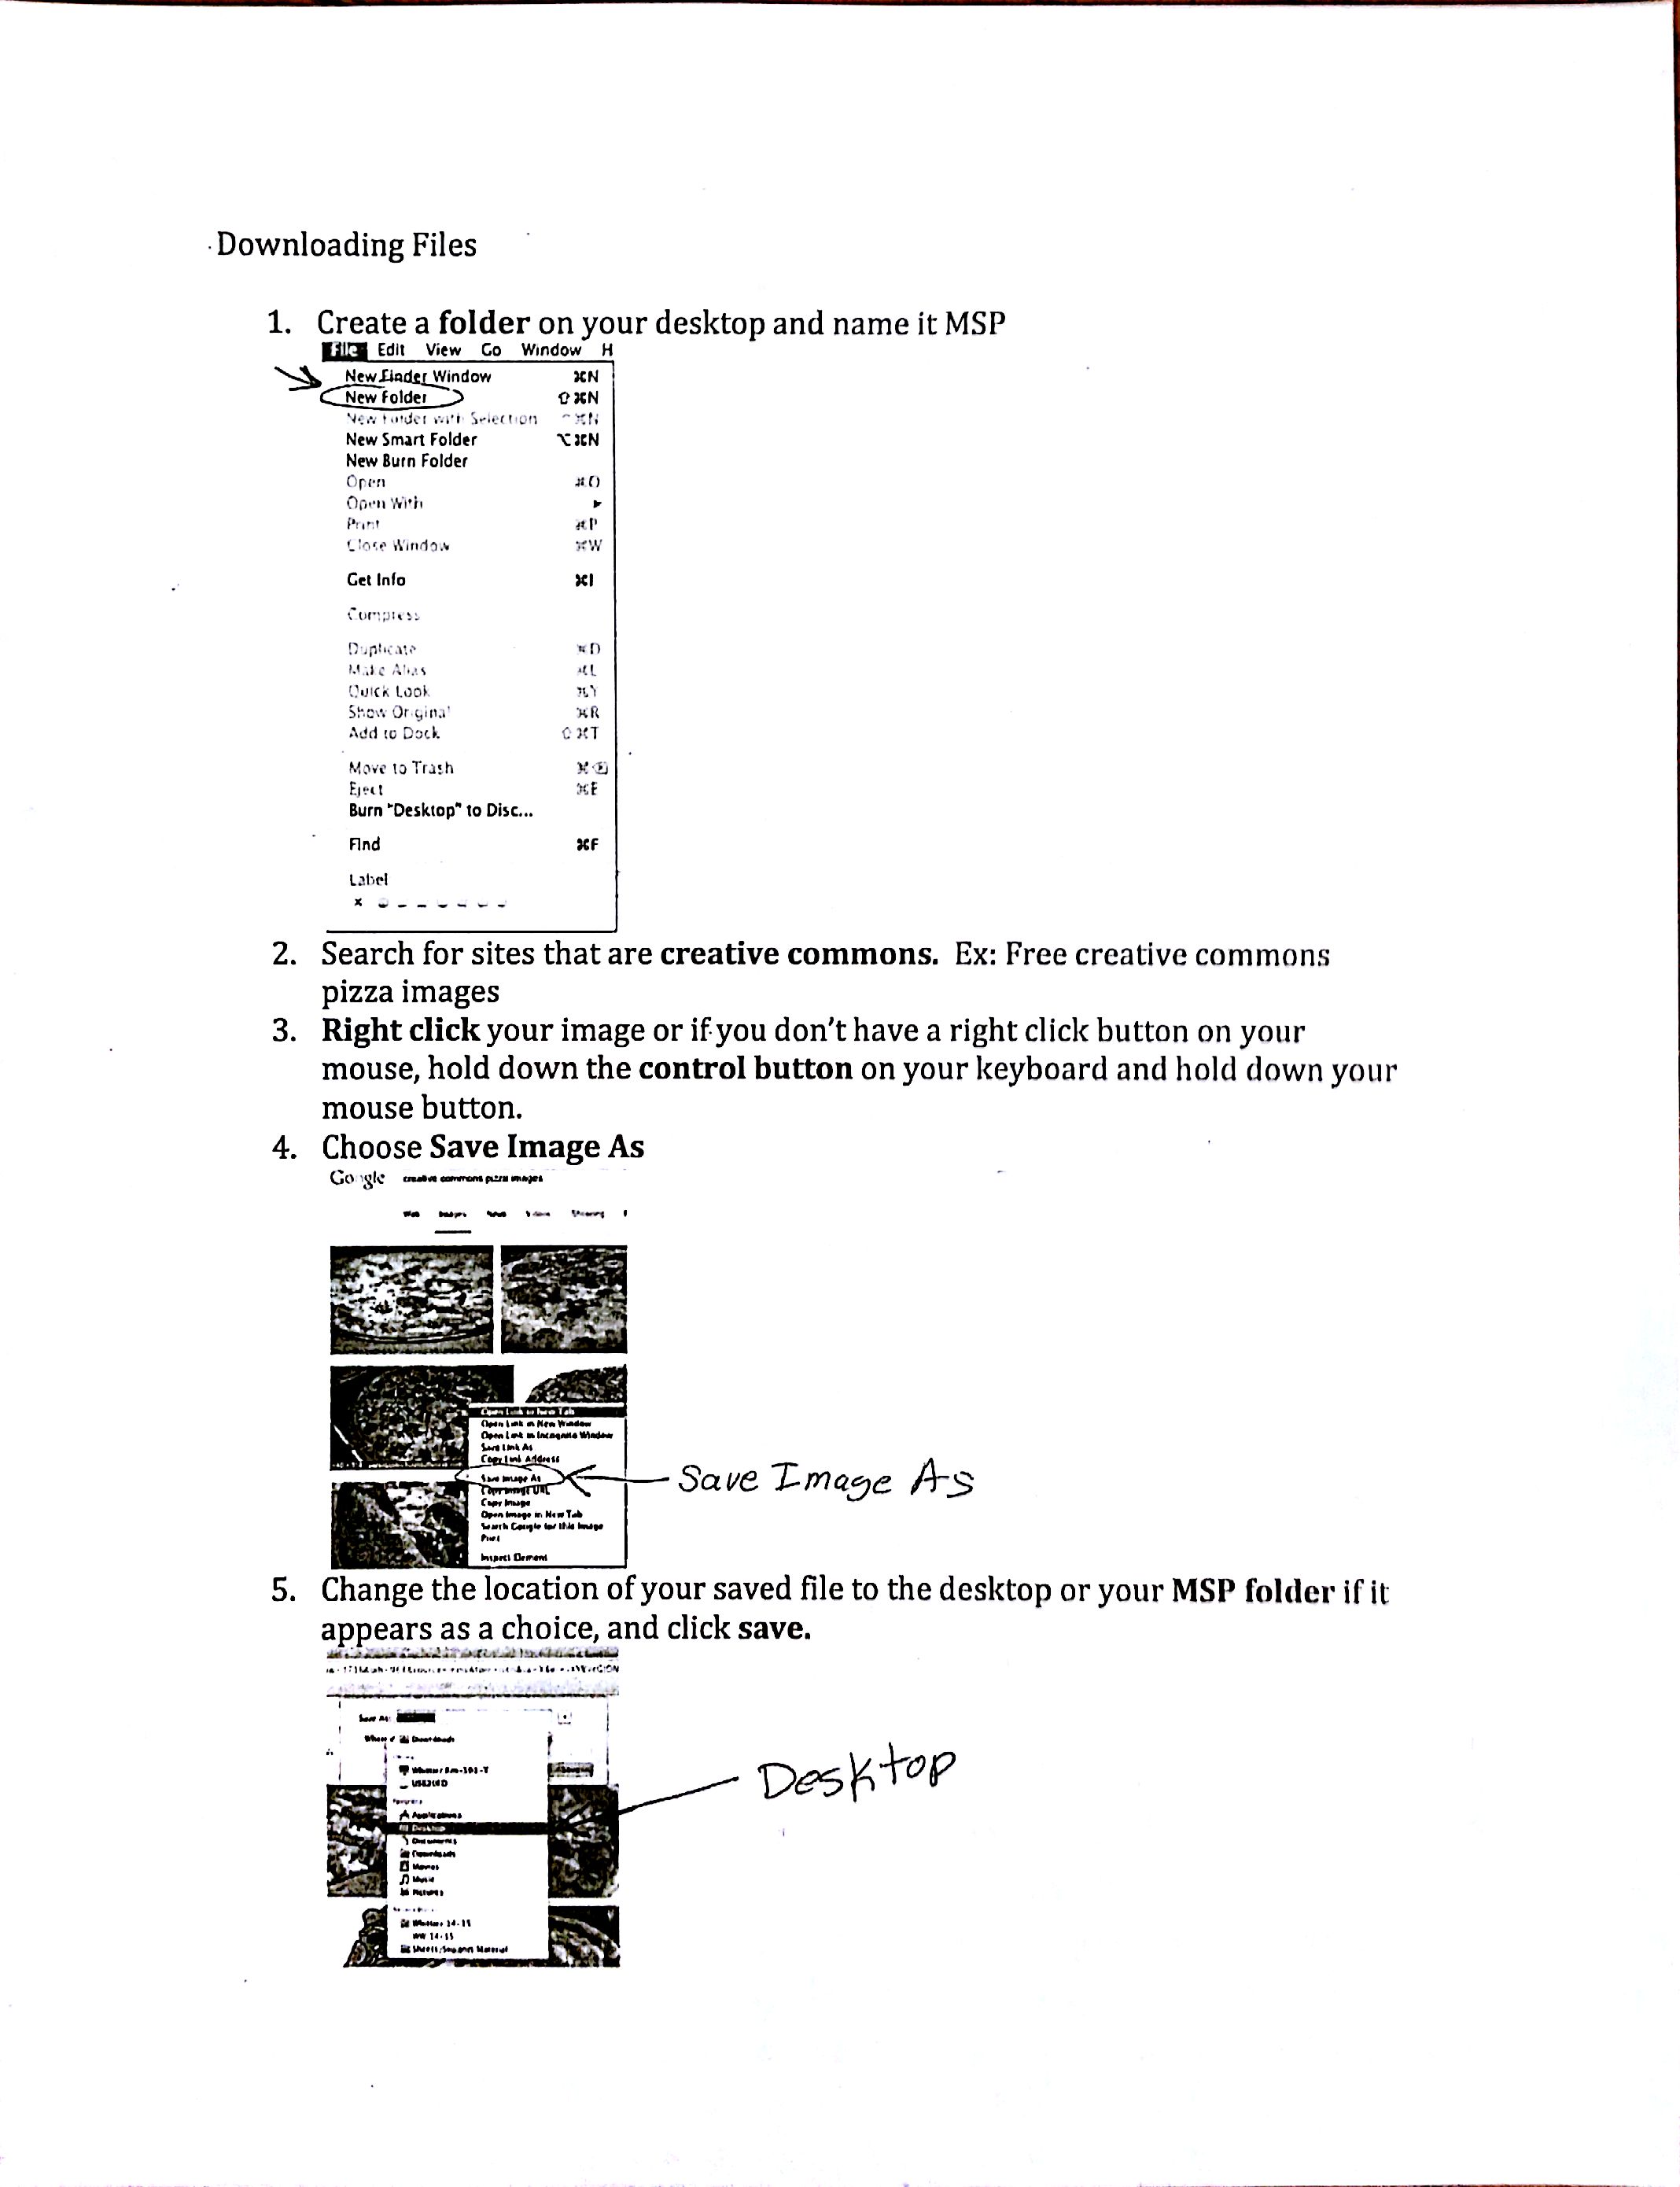
The MIT MoleMash tutorial for App Inventor introduces several best practices.

But sometimes “best practices” distract novices from what they really need to understand.

MoleMash means to introduce these particular big ideas:

  • sprites—which can move around and react to being “touched”
  • the random function, and using it to move a sprite by setting its X and Y coordinates
  • keeping a score variable, and incrementing it.

But the tutorial obscures these ideas by forcing you to learn other stuff:

Subprocedures. The code to move the mole around is put into a subprocedure.

  • But it’s only two lines long. We don’t need a subprocedure for this.

Positioning the mole by querying the canvas for its dimensions, constructing them as a ratio, and scaling it to the full canvas size by multiplying by the “random fraction” primitive. Seriously? I can barely understand this.

  • Let’s just hard-code some X and Y limits. It’s easier to explain to kids this way.

Concatenating label text with a numerical value. The approach for keeping score uses both a label to hold the word “Score” and a global for keeping track of the score number. Then, to update the score, the label “Score” plus the number value are concatenated.

  • Let’s just put a number only in the text label. Then we don’t need a separate global, and we can increment the label’s text directly.
  • Also there’s no need for an UpdateScore procedure.

With this simplified MoleMash, the entire code is this:

Code for simplified MoleMash.

This is far, far simpler than the MIT code.

Notice that the bounds of the random X and Y coordinates are 1 to 100. These are the default parameters of the “random integer” block when you pull it out of the palette.

This means that the mole will only jump about in the upper left corner of the canvas. That’s fine! Kids can figure out on their own how to expand the range.

For beginners, it’s better to use concrete values than abstract functions.

Time to MoleMash!

Azita is a technology teacher at the Andrews Middle School in Medford. This is her computer classroom:

Azita's classroom.
Azita’s classroom.

Kim, Akira and I visited with her today as she was introducing the MIT MoleMash tutorial to her students. They had previously worked on the MIT Paintpot tutorial.

Most of her students already had PaintPot working. Azita encouraged them to move on to MoleMash—if they needed to go back to PaintPot later, they could do that.

As with all of the other project classrooms, students were working in pairs.

The students had already been introduced to the Canvas in PaintPot. MoleMash introduced several new concepts—a sprite component inside the canvas, a clock component (which triggers the mole’s movements), and random numbers.

All four of us went around and worked with the students in small groups. Most of them were able to construct the interface elements for MoleMash. When I had the opportunity, I described the clock and random movement code to students directly, rather than having them copy it out of the tutorial.

I worked with two students in particular, Jamal and Raul, who were delighted when they got the mole jumping around! Then I encouraged them to explain their code to other students.

Extending the text-to-speech app

Mike is an engineering teacher, so his kids work in a spacious lab with lots of work areas, not just computers:

Mike's engineering classroom at Andrews Middle School
Mike’s engineering classroom at McGlynn Middle School

This was Mike’s 7th day into the Pathways in CS curriculum. Some of his students continued work on their versions of the MIT TalkToMe demonstration text-to-speech app, while others began the MIT Digital Doodle app. Like the other project classrooms, students were working in pairs, and midway through the class period, Mike asked them to “switch drivers” so that all students had mouse/keyboard time.

Some of his students were taking TalkToMe in fun directions. One pair of girls was working on “virtual boyfriend” app. When you pressed the button on the screen, the app would tell you a story in a deep British accent.

Another group was working on a Fortune Teller. Using App Inventor’s random number generator, the app would answer “Yes” or “No” to the question you typed in. Their code looked like this:

Fortune teller code—depending on the length of your question, you're more or less likely to get a “Yes” as the answer.
Fortune teller code—depending on the length of your question, you’re more or less likely to get a “Yes” as the answer.

The kid named Simon had keyed in the question—“Simon is awesome.” At first, their number range was from 1 to 50, so the app was mostly saying “No.” I encouraged them to think about how likely it was to say yes or no. At first they thought it was just random—or equally likely—but then the realized they were getting lots more No’s then Yes’s, and changed the range from 1 to 25. (The threshold between No and Yes is the length of the question-string. I had previously helped them with the length block.)

After class, Mike showed me his 15-session lesson plan for the project. He is taking notes after each session as to what’s actually been accomplished each day. Here’s the plan:

Mike class Mar 17_2

In the next class, he’ll be helping student learn about audio files, and getting them thinking about their final apps.

Doing the Digital Doodle

Debbie’s class has the computers arranged in rows, like this:

Debbie is using this computer room in the Andrews Middle School.
Debbie is using this computer room in the McGlynn Middle School.

All of the students were working in pairs.

In her class today, the students had built the MIT “Digital Doodle” tutorial, which lets you draw on the tablet using a Canvas component (see http://explore.appinventor.mit.edu/sites/all/files/hourofcode/DigitalDoodle_2perpage.pdf). The key bit of code looks like this (from Page 7 of the tutorial):

Code from MIT Digital Doodle tutorial PDF.

They all had it working. So then I asked them, can you get it to draw a different color?

A few of the students figured it out. Here’s the code from one of the groups:

Adding color to the Digital Doodle app with the Set Canvas PaintColor method.

The new part is the “Set Canvas PaintColor” command, plus the use of a color block.

I asked the students who figured it out to share the solution with each other.

Creative Commons images and teamwork

In Dawn’s classroom today, students were working on pairs on Macs. Here’s a photo of her lab (the kids had already left when I took the photo):

Dawn's classroom

She was leading a lesson that was projected at the front of the room, so all of the kids could see what she was doing. (She was standing off to the right side of the room, working on her own Mac.)

Dawn had the kids learn how to do safe searches by including the phrase “Creative Commons” in your search. She told them this will provide images that they’re allowed to use in their apps—even if they want to sell them in the Google Play store! She gave them an example of “creative commons pizza,” which produces results like this:

Creative Commons pizza search

Yum—when is lunch time!

Then she showed them how to right-click on an image and save it to the students’ project folders. This was trickier than it sounds, because most of the computers had that Apple mouse with the scrolly-wheel and no obvious right button! So students had to Control-click to get the pop-up menu with the “Save Image As…” dialog!

Dawn made a worksheet for kids to follow. It looked like this:

Dawn's worksheet for kids to search and save images.
Dawn’s worksheet for kids to search and save images.

Previously, Dawn had done a session with students where they brainstormed about what makes a good partner. Here’s what the class produced:

Dawn's class brainstorms about good partnerships!
Dawn’s class brainstorms about good partnerships!

Overall, today’s lesson was skill-building for when kids move on to making their own apps.

Rugged tablet cases and tablet cart

I visited the schools for the first time since the project has been running!

Which reminds me of one other part of the tablet story—rugged cases and the cart.

You definitely need drop-proof cases for the hardware—or at least, highly drop-resistant ones. We got these from Bobj:

Bobj rugged tablet case

Here’s a link to them on Amazon. They cost about $22 ea. Definitely worth the money to protect a $150 tablet.

The other part of the story is the tablet cart. It organizes all 20 of the classroom tablets. We numbered each tablet and each slot, so kids know where to put their tablets back. When Debbie’s class was over, she called them up by groups—1 through 5, 6 through 10, etc. so kids wouldn’t get too much in each others’ way putting the tablets back.

The cart cost about $1000. It has all the chargers installed with individual USB cables tied in place for each slot. It’s on wheels, it’s solid, and it locks. Totally necessary.

tablet cart

ASUS MeMO Pad 7s!

We decided to standardize on the ASUS MeMO Pad 7 for the first year of our project. This tablet has a good combination of a decent screen, solid build, and reasonable price.

One key feature of these tablets is that they have regular micro-USB ports for charging, and they will charge when plugged into a computer. Kids can use them all day plugged in and they’ll stay charged. Samsung tablets will only charge from their special adapters, and the 7″ Google Nexus tablet (otherwise our first choice) is no longer being manufactured.

We bought the MeMO Pads from a tech integrator, together with charging carts for each classroom.

The exact model is the ASUS MeMO Pad 7 ME176CX.

ASUS MeMO Pad 7 in a rainbow of colors (I think we just got the black ones.)

Sample Teacher Lesson Plans

Here is a sample of one of the teacher’s lesson plans developed this year. I think this sampling here gives one an understanding the level of basic computer skills required to start the programming work. See below for a link to the full curriculum progression over the full 15-20 hours.

Day 5 – Computer Skills Knowledge

Main Goal/ Overview

Have the students get familiar with “driving around” the computer so that they have more ease of use when creating apps.


Learning Objectives

Knowledge – Knowledge of computer organization.

Skills – Have the students get familiar with downloading files, where to save a file to the hard drive, files, folders, naming files, and stress organization.


Day 6 – Starting App Inventor

Main Goal/ Overview

Have the students get familiar with “driving around” App Inventor.

Learning Objectives Knowledge and Skills – Have the students get familiar with logging into Google, going to App Inventor website, hooking up tablet, connecting via USB, look at display, look at blocks, and see how that affects the tablet.


Full Curriculum Link


Teacher Professional Development

Brainstorming ideas for apps.

Our teacher professional development (PD) began in early October of 2014.

We have the participation of five middle school teachers—three from Medford and two from Everett.

Presently, we’ve finished the principal teacher PD, which consisted of 11 workshops that happened pretty much weekly. The PD consisted of these main elements:

  • Project Background
  • Orientation to Computing
  • Computational Thinking Skills Building
  • Curriculum Development
  • Logistics Assistance

Project Background. We got the teachers up to speed of the general situation regarding Computing in Education in the United States and how this project aims to promote a computing experience amongst Middle Schoolers in Medford and Everett. We also pointed out how this project aims to study of our work’s effects on CS education pipeline later as these student progress into High School.

Orientation to Computing and Computational Thinking Skills Building. Teachers were introduced to hands-on programming work and readings that discussed various approaches that aim to alleviate the known obstacles to building computing skills and confidence. The hands-on approach got teachers quickly learning practical skills, and within weeks all were able to build their own apps for their Android tablets!

Curriculum Development. Interwoven into our Computing Skills Building training was discussion about how these learned skills and knowledge would be implemented in their own class rooms. By Session 6, we were fully on to the topic of Curriculum Development and teachers were asked to focus on plans to integrate their own class objectives with a selected few of the CSTA Learning Standards.

These 3 were:

  • Computational Thinking—Use the basic steps in algorithmic problem solving to design solution
  • Computational Practice—Identify interdisciplinary careers that are enhanced by computer science
  • Collaboration—Exhibit dispositions necessary for collaboration: providing useful feedback, integrating feedback, understanding and accepting multiple perspectives, socialization

At the end of this process, teachers had written their curriculum goals and created lesson plans; we’ll share a sample in a subsequent post.

Logistics Assistance: This support thus far has been provided mostly by Teacher Mentor Akira Kamiya and undergraduate assistant Kim Douglas. To date, desktop computers with appropriate drivers and set up the tablets to be ready for student use. This included installing a Demo App made by one of the teachers during our PD. We also set up Google Drive to allow direct access to teacher shared files. This entailed thinking through out Google’s complex cross device sharing which was cause for some concern regarding privacy. We feel now that this has been sufficiently worked out.

This work is ongoing and includes technical assistance  Updates will be forthcoming!

Research Plan

The MSP project’s research will investigate student learning outcomes, teacher outcomes, and questions of broadening participation in STEM. The specific research questions we will address are as follows:

  1. How do the project’s school-day and summer-intensive project work and career awareness activities impact students’ attitudes toward computing and ability to engage in computing practices?
  2. How do the project’s collaborative professional development model leads to teacher content learning and curricular adoptions?
  3. How do the the school-day intervention leads to students’ choice of continued involvement in computing—i.e., the summer camps and future opportunities beyond middle school?

The research team will employ a mixed-methods approach.  In collaboration with the evaluation team,  we are planning to develop/use multiple tools for data collection: (1) embedded content assessments, (2) surveys of CS attitudes and activities, (3) CS Summer Camp Survey, (4) interviews and Focus Groups, (5) observations,  (6) analysis of students’ apps, (7) performance assessments (e.g., debugging activity), (8) secondary analysis of school administrative data, and (9) follow up surveys and interviews.,analysis of students’ apps.

Currently, the research team is focusing on addressing questions regarding students’ development of computational thinking, including designing  an embedded content assessment, analysis of students’ apps, developing performance assessments and using structured interviews to example students’ broader development of computational thinking practices.